
/3-(2-Dimethylaminoethyl)-1H-indol-4-yl/ dihydrogen phosphate
C12H17N2O4P
Отказ от ответственности:
Выращивание псилоцибиновых грибов для употребления — потенциально незаконная деятельность, и мы не поощряем и не оправдываем эту деятельность, если она противоречит закону. Однако мы признаем, что люди будут выращивать псилоцибиновые грибы, и считаем, что предоставление ответственной информации о снижении вреда является обязательным условием обеспечения безопасности людей. По этой причине данное руководство разработано для обеспечения безопасности тех, кто решил выращивать псилоцибиновые грибы.
ВВЕДЕНИЕ
Все больше людей выращивают псилоцибиновые грибы в домашних условиях. Помимо обеспечения надежных круглогодичных поставок, домашнее выращивание исключает риск неправильной идентификации грибов в дикой природе. Для многих культиваторов это также веселое и недорогое хобби.
ИСТОРИЯ
Это руководство основано на одноименном методе Роберта «Psylocybe Fanaticus» Макферсона PF Tek — методе, который произвел революцию в выращивании грибов в помещении. Ключевым новшеством Макферсона было добавление вермикулита в субстрат на основе зерна (в отличие от использования только зерна), что давало мицелию больше пространства для роста и имитировало естественные условия. Хотя его метод немного более трудоемкий, чем другие, и часто дает меньший урожай, его простота, низкая стоимость и надежность делают его идеально подходящим для начинающих. Кроме того, в нем используются легкодоступные материалы и ингредиенты, многие из которых, возможно, у вас уже есть.
СПОРНЫЕ СИРИНГИ
Единственное, с чем у вас могут возникнуть проблемы, — это хороший шприц для спор. Он будет содержать споры ваших волшебных грибов и использоваться для их «посева» в субстрат. Некоторые производители сообщают о проблемах загрязнения, неправильном определении штаммов и даже о шприцах, не содержащих ничего, кроме воды. Однако, если вы проведете исследование и найдете авторитетного поставщика, у вас не должно возникнуть никаких проблем.
В любом случае, после того как вы вырастили свою первую партию (или флешь) грибов, вы можете начать заполнять шприцы самостоятельно (см. часть 4).
КАКОЙ СОРТ ВЫБРАТЬ?
Изучая, как выращивать псилоцибиновые грибы в помещении, вы должны определиться с видом и сортом. Большинство поставщиков предлагают широкий выбор, но грибы Psilocybe cubensis B+ и Golden Teacher являются одними из самых популярных среди начинающих. Хотя они не такие мощные, как некоторые другие, например, Penis Envy, они, как сообщается, более снисходительны к неоптимальным и переменчивым условиям.
ЧТО ВАМ ПОНАДОБИТСЯ
ИНГРЕДИЕНТЫ
Шприц для спор, 10-12 см3
Органическая мука из коричневого риса
Вермикулит, средний/мелкий
Питьевая вода
ОБОРУДОВАНИЕ
12 полупинтовых банок без плечиков с крышками (например, банки для желе или консервов Ball или Kerr)
Молоток и небольшой гвоздь
Мерная чашка
Миска для смешивания
Ситечко
Прочная оловянная фольга
Большая кастрюля с плотной крышкой для приготовления на пару
Небольшое полотенце (или около 10 бумажных полотенец)
Микропористая лента
Прозрачная пластиковая коробка для хранения, 50-115 л
Дрель с ¼-дюймовым сверлом
Перлит
Бутылка с распылителем тумана
ГИГИЕНИЧЕСКИЕ ПРИНАДЛЕЖНОСТИ
Спирт для протирания
Бутан/пропановая зажигалка
Дезинфицирующее средство для поверхностей
Дезинфицирующее средство для воздуха
Стерилизованные латексные перчатки (необязательно)
Хирургическая маска (необязательно)
Неподвижный воздух или перчаточный бокс (опционально)
ИНСТРУКЦИИ
03Этот метод выращивания грибов дешев и довольно прост, поэтому идеально подходит как для начинающих грибников, так и для опытных «грибников». Вы готовите субстрат из коричневой рисовой муки, вермикулита и воды и распределяете его между стерильными стеклянными банками. Внесите споры и ждите развития мицелия. Это сеть нитей, которые будут служить основой для роста грибов. Через 4-5 недель перенесите колонизированные субстраты, или «лепешки», в камеру плодоношения и ждите роста грибов.
ПРИМЕЧАНИЕ: Перед началом работы всегда соблюдайте правила гигиены: распылите дезинфектор воздуха, тщательно продезинфицируйте оборудование и поверхности, примите душ, почистите зубы, наденьте чистую одежду и т.д. Вам не нужно много места, но ваша среда должна быть как можно более стерильной. В условиях выращивания грибов могут размножаться бактерии и плесень, поэтому очень важно свести риск к минимуму.
Домашнее выращивание «сделай сам» подходит не всем. Если вы хотите изучить функциональные или психоделические грибы, не выращивая их самостоятельно, ознакомьтесь с «Окончательным руководством по поиску психоделических лекарств» от Third Wave.
Want to easily grow mushrooms at home?
Third Wave’s Mushrooms Grow Kit and Course turn the daunting task of cultivating mushrooms into a simple one.
Our in-depth guide and step-by-step videos will have you harvesting your own home-grown mushrooms in no time.START GROWING MUSHROOMS TODAY
STEP 1: PREPARATION
1) Prepare jars:
- With the hammer and nail (which should be wiped with alcohol to disinfect) punch four holes down through each of the lids, evenly spaced around their circumferences.
2) Prepare substrate:
- For each jar, thoroughly combine ⅔ cup vermiculite and ¼ cup water in the mixing bowl. Drain excess water using the disinfected strainer.
- Add ¼ cup brown rice flour per half-pint jar to the bowl and combine with the moist vermiculite.
3) Fill jars:
- Being careful not to pack too tightly, fill the jars to within a half-inch of the rims.
- Sterilize this top half-inch with rubbing alcohol
- Top off your jars with a layer of dry vermiculite to insulate the substrate from contaminants.
4) Steam sterilize:
- Tightly screw on the lids and cover the jars with tin foil. Secure the edges of the foil around the sides of the jars to prevent water and condensation from getting through the holes.
- Place the small towel (or paper towels) into the large cooking pot and arrange the jars on top, ensuring they don’t touch the base.
- Add tap water to a level halfway up the sides of the jars and bring to a slow boil, ensuring the jars remain upright.
- Place the tight-fitting lid on the pot and leave to steam for 75-90 minutes. If the pot runs dry, replenish with hot tap water.
NOTE: Some growers prefer to use a pressure cooker set for 60 minutes at 15 PSI.
5) Allow to cool:
- After steaming, leave the foil-covered jars in the pot for several hours or overnight. They need to be at room temperature before the next step.
STEP 2: INOCULATION
1) Sanitize and prepare syringe:
- Use a lighter to heat the length of your syringe’s needle until it glows red hot. Allow it to cool and wipe it with alcohol, taking care not to touch it with your hands.
- Pull back the plunger a little and shake the syringe to evenly distribute the magic mushroom spores.
NOTE: If your spore syringe and needle require assembly before use, be extremely careful to avoid contamination in the process. Sterilized latex gloves and a surgical mask can help, but the surest way is to assemble the syringe inside a disinfected still air or glove box.
2) Inject spores:
- Remove the foil from the first of your jars and insert the syringe as far as it will go through one of the holes.
- With the needle touching the side of the jar, inject approximately ¼ cc of the spore solution (or slightly less if using a 10 cc syringe across 12 jars).
- Repeat for the other three holes, wiping the needle with alcohol between each.
- Cover the holes with micropore tape and set the jar aside, leaving the foil off.
- Repeat the inoculation process for the remaining jars, sterilizing your needle with the lighter, and then alcohol between each.
STEP 3: COLONIZATION
1) Wait for the mycelium:
- Place your inoculated jars somewhere clean and out of the way. Avoid direct sunlight and temperatures outside 70-80 °F (room temperature).
- White, fluffy-looking mycelium should start to appear between seven and 14 days, spreading outward from the inoculation sites.
NOTE: Watch out for any signs of contamination, including strange colors and smells, and dispose of any suspect jars immediately. Do this outside in a secure bag without unscrewing the lids. If you’re unsure about whether a jar is contaminated, always err on the side of caution—even if the substrate is otherwise healthily colonized—as some contaminants are deadly for humans.
2) Consolidate:
- After three to four weeks, if all goes well, you should have at least six successfully colonized jars. Leave for another seven days to allow the mycelium to strengthen its hold on the substrate.
STEP 4: PREPARING THE GROW CHAMBER
1) Make a shotgun fruiting chamber:
- Take your plastic storage container and drill ¼-inch holes roughly two inches apart all over the sides, base, and lid. To avoid cracking, drill your holes from the inside out into a block of wood.
- Set the box over four stable objects, arranged at the corners to allow air to flow underneath. You may also want to cover the surface under the box to protect it from moisture leakage.
NOTE: The shotgun fruiting chamber is far from the best design, but it’s quick and easy to build and does the job well for beginners. Later, you may want to try out alternatives.
2) Add perlite:
- Place your perlite into a strainer and run it under the cold tap to soak.
- Allow it to drain until there are no drips left, then spread it over the base of your grow chamber.
- Repeat for a layer of perlite roughly 4-5 inches deep.
STEP 5: FRUITING
1) “Birth” the colonized substrates (or “cakes”):
- Open your jars and remove the dry vermiculite layer from each, taking care not to damage your substrates, or “cakes”, in the process.
- Upend each jar and tap down onto a disinfected surface to release the cakes intact.
2) Dunk the cakes:
- Rinse the cakes one at a time under a cold tap to remove any loose vermiculite, again taking care not to damage them.
- Fill your cooking pot, or another large container, with tepid water, and place your cakes inside. Submerge them just beneath the surface with another pot or similar heavy item.
- Leave the pot at room temperature for up to 24 hours for the cakes to rehydrate.
3) Roll the cakes:
- Remove the cakes from the water and place them on a disinfected surface.
- Fill your mixing bowl with dry vermiculite.
- Roll your cakes one by one to fully coat them in vermiculite. This will help to keep in the moisture.
4) Transfer to grow chamber:
- Cut a tin foil square for each of your cakes, large enough for them to sit on without touching the perlite.
- Space these evenly inside the grow chamber.
- Place your cakes on top and gently mist the chamber with the spray bottle.
- Fan with the lid before closing.
5) Optimize and monitor conditions:
- Mist the chamber around four times a day to keep the humidity up, taking care not to soak your cakes with water.
- Fan with the lid up to six times a day, especially after misting, to increase airflow.
NOTE: Some growers use fluorescent lighting set on a 12-hour cycle, but indirect or ambient lighting during the day is fine. Mycelium only needs a little light to determine where the open air is and where to put forth mushrooms.
STEP 6: HARVESTING
1) Watch for fruits:
- Your mushrooms, or fruits, will appear as tiny white bumps before sprouting into “pins.” After 5-12 days, they’ll be ready to harvest.
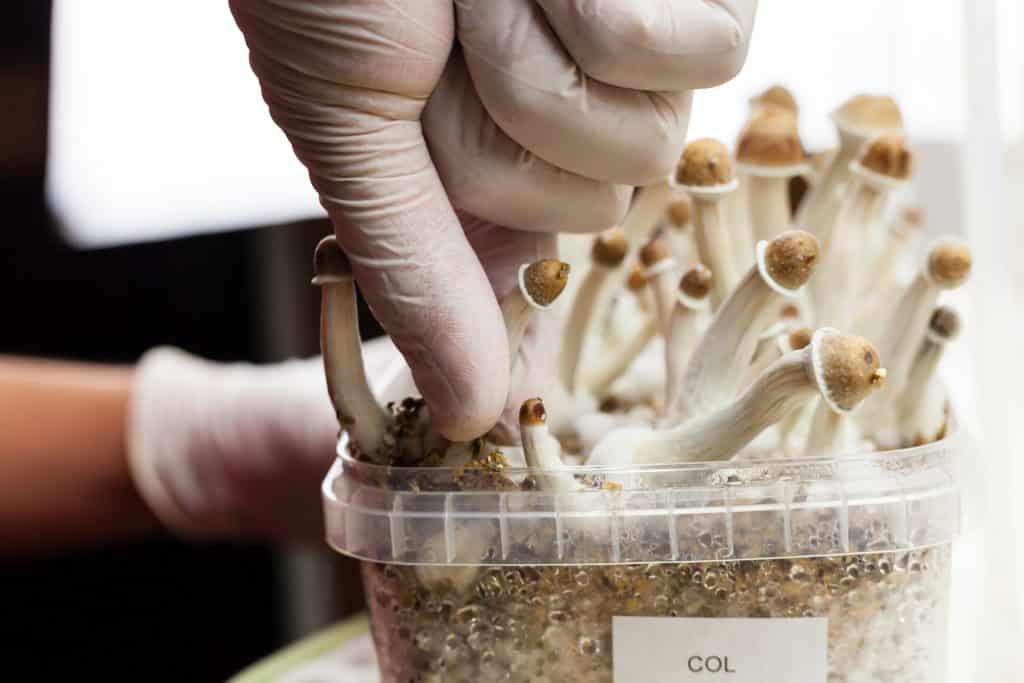
2) Pick your fruits:
- When ready, cut your mushrooms close to the cake to remove. Don’t wait for them to reach the end of their growth, as they’ll begin to lose potency as they mature.
NOTE: The best time to harvest mushrooms is right before the veil breaks. At this stage, they’ll have light, conical-shaped caps and covered gills.CHOOSING A PSYCHEDELIC RETREAT IS A BIG DECISION. CHOOSE WISELY.Explore our trusted network of psychedelic retreat centers in the free Third Wave Directory. Compare facilities, participant reviews, and pricing to find the right fit for your unique needs.GO TO THE DIRECTORY
WHAT NEXT?
04
STORAGE
Psilocybin mushrooms tend to go bad within a few weeks in the fridge. So if you plan to use them for microdosing or you just want to save them for later, you’ll need to think about storage. The most effective method for long-term storage is drying. This should keep them potent for two to three years as long as they’re kept in a cool, dark, dry place. If they’re stored in the freezer, they’ll pretty much last indefinitely.
The lo-fi way to dry your mushrooms is to leave them out on a sheet of paper for a few days, perhaps in front of a fan. The problem with this method is they won’t get “cracker dry.” That is, they won’t snap when you try to bend them, which means they’ll still retain some moisture. They may also significantly diminish in potency, depending on how long you leave them out. Using a dehydrator is by far the most efficient method, but those can be expensive. A good alternative is to use a desiccant as follows:
- Air dry your mushrooms for 48 hours, ideally with a fan.
- Place a layer of desiccant into the base of an airtight container. Readily available desiccants include silica gel kitty litter and anhydrous calcium chloride, which you can purchase from hardware stores.
- Place a wire rack or similar set-up over the desiccant to keep your mushrooms from touching it.
- Arrange your mushrooms on the rack, ensuring they’re not too close together, and seal the container.
- Wait for a few days, then test to see if they’re cracker dry.
- Transfer to storage bags (e.g. Ziploc, vacuum-sealed) and place in the freezer.
REUSING THE SUBSTRATE
After your first flush, the same cakes can be re-used up to three times. Simply dry them out for a few days and repeat Step 5.2 (dunking). But don’t roll them in the vermiculite; just place them back in the grow chamber and mist and fan as before. When you start to see contaminants (usually around the third re-use), drench the cakes with the mister spray and dispose of them outside in a secure bag.
MAKING SPORE SYRINGES
Filling your own psilocybin spore syringes is about as self-sufficient as it gets.
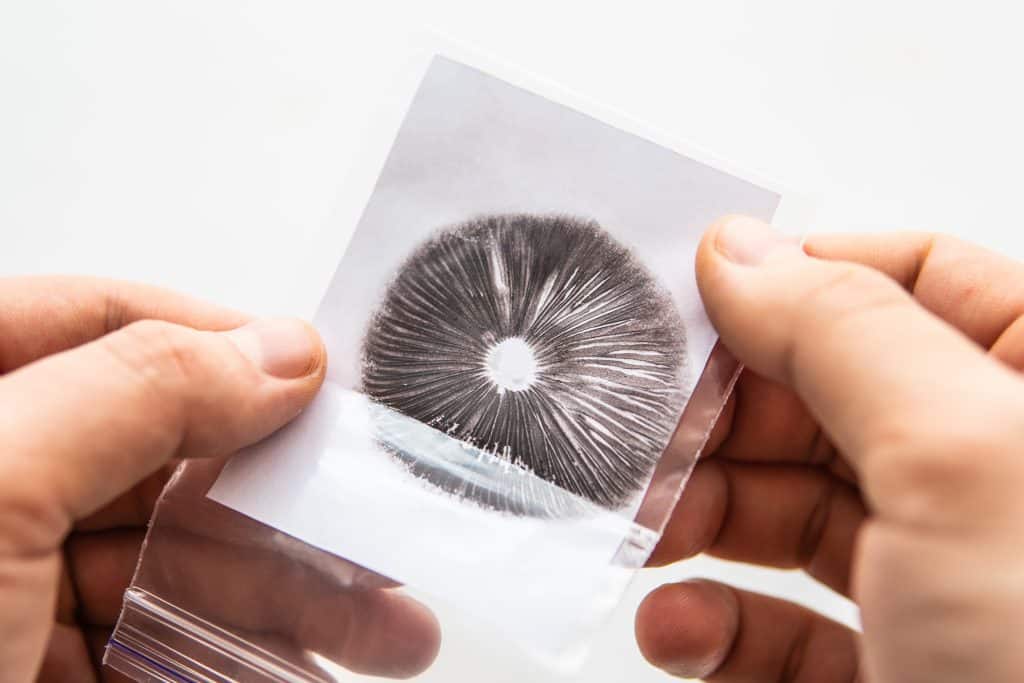
First, you’ll need to take a spore print from a mature mushroom, i.e. one that’s been allowed to grow until its cap has opened out and the edges are upturned. You should also notice an accumulation of dark purple deposits around the base. These are the magic mushroom spores.
To collect them, remove the cap with a flame-sterilized scalpel and place it gills down on a sterile paper sheet. Cover with a disinfected glass or jar to protect it from the air and leave for 24 hours. Keep the resulting spore print out of light in an airtight plastic bag.
To load a spore syringe, scrape some of the spore print into a sterile glass of distilled water. You can find this at auto supply stores. Then fill your syringe (which should also be sterile) and empty it back into the glass several times to evenly distribute the spores. Fill it a final time and place it inside an airtight plastic bag. Leave at room temperature for a few days to allow the spores to hydrate. You can then keep the syringe in the fridge until you’re ready to use it. It should last at least two months.
ADAPTATIONS AND ALTERNATIVES
Numerous modifications have been made to the PF Tek method, both to increase yield and to make things easier. Different species also tend to produce better with different substrates and conditions.
The main alternative to the basic PF Tek is the monotub method, which involves spawning to bulk on coir (coconut fiber extract), manure, straw, or some other fresh and nutritious substrate. Eventually, you may want to experiment with some of these other methods, but the PF Tek is a good introduction for now.
FAQ
05
How long does it take to grow magic mushrooms at home?
The time it takes for your mycelium-colonized substrate to put forth harvestable fruits depends on several factors. But the whole process of cultivating mushrooms should take between 1-2 months.
Want to learn how to grow your own mushrooms from home? Check out Third Wave’s Mushroom Grow Kit and Course.
When to harvest shrooms?
You should be able to harvest your fruits 5-12 days after they first begin to sprout from the mushroom substrate.
The trick is to harvest them before the veil breaks, i.e before they fully mature and release their spores. In other words, the gills should still be covered. At this stage, your mushrooms should also have light, conical caps.
How to make a spore syringe?
We’ve included instructions for making a spore syringe above. You’ll need a sterilized knife or scalpel, a sterile paper sheet, and a disinfected glass or jar to gather psilocybin spores from a mushroom allowed to mature. Add the mushroom spores to a glass of distilled water and load your sterile syringe from that. After leaving it at room temperature for a few days to hydrate, you can store it in the fridge for at least a couple of months.
How to grow psilocybin mushrooms at home without spores?
Use a Psilocybe cubensis grow kit if you don’t want to add the mushroom spores yourself. The typical cubensis grow kit comes with an already colonized substrate for growing mushrooms in a box. They’re available for different cubensis varieties, as well as different species.
What is the best mushroom substrate?
Although tried and tested by generations of mushroom growers, the brown rice flour and vermiculite substrate may not be the best choice for everyone. It depends on your priorities. Brown rice flour is good for growing in bulk, but coir may be cheaper and easier to use. Then there’s whole brown rice (not flour), which supposedly yields more potent fruits.
Pasteurized horse manure is another good option since it’s high in phosphorus, nitrogen, and potassium. And throwing spent coffee grounds into the mix (up to a quarter of the whole) could help speed up colonization. Of course, spent coffee grounds are economical too; 99% of coffee biomass that doesn’t end up in the cup is usually just thrown away.
Some growers say the best mushroom substrate is crammed full of nutritional diversity. However, too many nutrients from too many different sources can lead to contamination. As a beginner, you’re better off keeping things simple–not to mention cheap enough for trial and error.
What’s the difference between magic mushroom spawn and substrate?
As you learn more about growing mushrooms indoors, you’re likely to see the terms ‘spawn’ and ‘substrate’ used seemingly interchangeably (or just incorrectly).
Put simply, your ‘substrate’ (the brown rice flour/vermiculite cakes in the PF Tek method) becomes ‘spawn’ if it’s used to colonize a second, ‘bulk substrate’ (coir, manure, etc.) in the fruiting chamber.
If you’re fruiting directly from the cakes, as directed by this guide, your mushroom substrate remains the ‘substrate’ even after removal from the jars.
You can purchase spawn, substrate and casing kits through Third Wave’s Mushroom Grow Kit and Course.
What are the best Psilocybe cubensis strains?
As mentioned in the guide, some of the most popular P. cubensis strains (or varieties) for beginners are the B+ and Golden Teacher mushrooms. Experienced growers may prefer Penis Envy.
However, as with your choice of substrate, the best cubensis strain for you will depend on your priorities for cultivating mushrooms. See here and here for more information.
How to grow magic truffles?
Forget about growing mushrooms in a box; truffles are often grown in jars instead of a fruiting chamber. See this tek for details. Another key difference to the PF Tek as outlined above is the use of boiled rye grain (aka rye berries) substrate.
Popular truffle varieties include P. mexicana and P. tampanensis, also known as ‘philosopher’s stones’.
Where can I find supplies for growing mushrooms?
One of the great things about the PF Tek method is that supplies are widely available. What you haven’t already got lying around the house can be found at your local hardware store.
What are my alternatives to home-growing mushrooms?
Are you missing a green thumb? No worries. If you’d prefer sourcing psychedelic medicine rather than growing it yourself, Third Wave’s Ultimate Guide to Sourcing Psychedelic Medicines provides recommendations for legal sourcing in most countries. In addition, this guide offers step-by-step instructions for navigating the dark web and suggestions for purchasing lesser-known (legal) psychedelic alternatives with similar effects
The only thing you’ll need a specialist supplier for is your first load of psilocybin spores. The best way to find a reputable one is through forums.
USEFUL LINKS
06Read our Essential Guide to Psilocybin Mushrooms
What’s it like to take Psilocybin Mushrooms?
How to prepare Psilocybin Mushrooms for microdosing
Third Wave’s Mushroom Grow Kit & Course
This blog article uses affiliate links. Third Wave receives a small percentage of the product price if you purchase through any affiliate links. Read our ethics and affiliates policy here.